Resilience an easy to learn life’s lesson though pizza

Introduction

On 3 January 2025, I did make my first attempt at taco pizza; however lack of ingredients and the weather made it impossible to get the ingredients in time. So, I perserved and did not let a set back deter me.

So, if you are one of the approximately 325,000 American expats living in the United Kingdom you know that it is nearly impossible to find an authentic taco and if you love taco pizza then you know it is almost impossible to find. Look no further, I will walk you through how to make your own taco pizza that I demonstrated during my live stream on Facebook on 19 January 2025.

Pizza Dough

If you are truly looking for homemade pizza experience then you will need to make your own pizza dough and if you click this these links, this will take you to a recipe for an east to make homemade pizza dough and the other will take you to Be Berry Informed Facebook page where you can watch a video on making your own homemade pizza dough.

When making homemade pizza dough the trick is not to rush it and let it rise, at least overnigh in the refrigerator.

Taco Pizza Recipe

You will need:

240g – 400g of mince (I prefer less since it minimises the risk that that dough will go soggy)

1 large white onion or 2 medium white onions minced

1 head of iceberg lettuce thinly cut.

1 – 2 packages of Tesco’s Taco Seasoning – A Taste of Mexico

1 400g can Mutti Flavoured Pizza Sauce Aromatica

240g Shredded Mild Cheddar Cheese

2 Large Fresh Vine Rippen Tomatoes chopped

1 – 240 g package of mozarella cheese

1 small glass of water

Pre-heat your oven to 400 degrees Farenheit or 200 degrees Celcius.

How to Prepare Your Taco Pizza

Getting the dough ready

Before doing anything take out your bread dough and let warm up to room temperature, allow about an hour. After it has warmed to room temperature, push the dough down and let it rise to double its size. Depending on room temperature, this will be approximately 1 – 2 hours.

For a crispier crust, I recommend doing your prep work while the dough is doubling in size but if you desire a more thicker crust then, I recommend letting the dough double in size. Once it has doubled in size spinkle a bit of flough on your counter, take some dough and roll it out to the size of your pizza pan. The dough should be about 1/4″ – no more than 1/2″ thick. Place the dough in the pan, cover it, and let it rise as you do your prep.

Doing your preparation work

Taco pizza needs to be in two stages.

Stage 1: Making the foundation

In the first stage you need to cook your mince on medium heat until brown. Once it has browned you will need to drain the fat. Depending on how seasonsed you like your tacos, add 1/2 – 1 package of Tesco’s Taco Season – A taste of Mexico taco seasoning to the mince and add a bit of water to the pan. You can use any taco seasoning but I find Tesco’s taco seasoning is the closest I have found to the authentic taste.

Mix together and reduce heat to low and cook until the water has evaporated. As the water evaporates the mince and seasoning begin to make a thick sauce. This will take about 5 – 10 minutes. Once the meat has cooked to the desired consistancy remove the pan from the heat and if you prefer transfer the taco beef to a bowl.

If you are opting for a thinner crust, take some dough and roll it out to about 1/4″ thickness. Place the dough into the pizza pan and shape to it.

Take a fork and pierce the dough in several places. This will keep the dough from contracting too much while cooking and help prevent large bubbles from forming. After piercing the dough, pre-cook the dough into the over for about 3 – 5 minutes.

While the dough is pre-cooking, pour out about 1/4 – 1/2 of the pizza sauce can into a bowl and the remaining taco sauce to it. As you add the seasoning to the sauce, ensure the seasoning mixes well.

The pizza pan will be hot. Take out the dough from the oven wearing oven mits and let it cool down for a few minutes.

After letting it cool, add the pizza sauce and spread around the pan. Now add the seasoned mince and about 1/4 – 1/2 of the oninon you have chopped. Sprinkle the top of the pizza with Mozeralla cheese and let it cook until the cheese browns. Depending on your oven, this will be around 10 – 20 minutes.

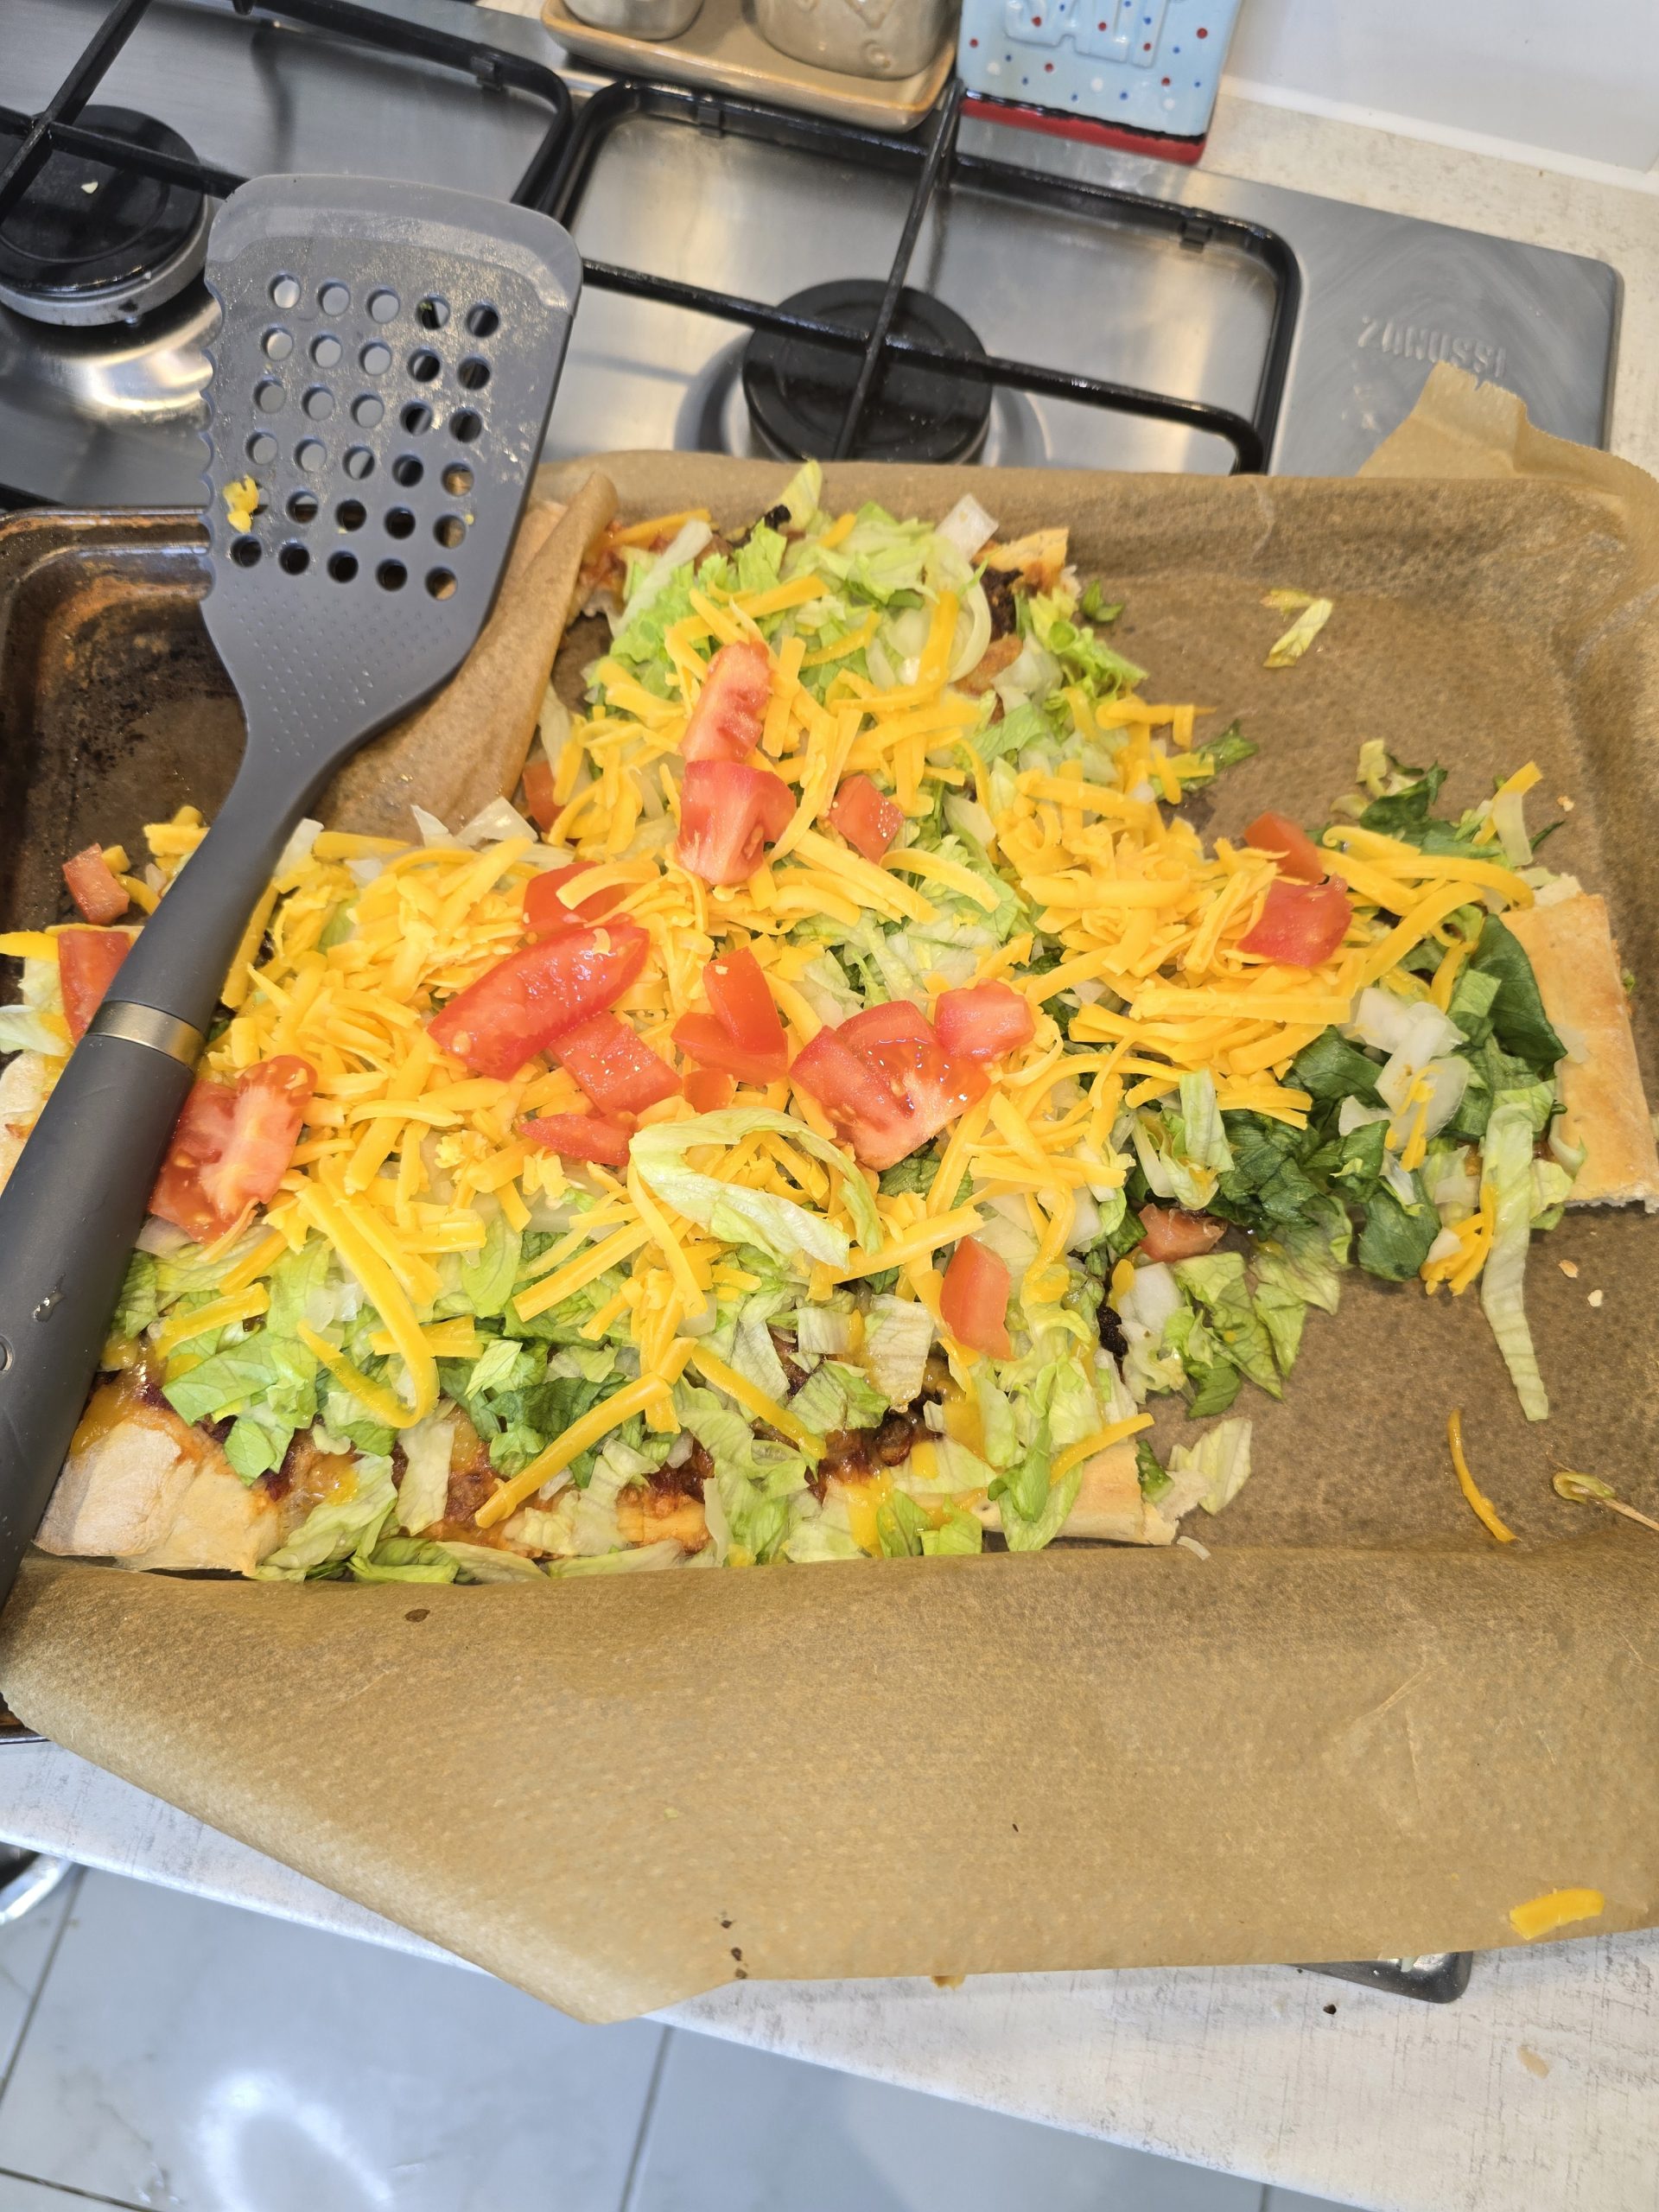
Stage 2: Creating the Taco Experience

If find, due to amount of toppings on a taco pizza that it works best to cut the pizza first. After cutting the pizza sprinkle the top with lettuce, onions, cheddar cheese, and top with tomatoes. If you like sour cream you can add sour cream.

Enjoy.

(c) copyright 2025 Be Berry Informed all rights reserved.

How to create memories through humble pie pizza

About this post

Thank you for stopping by today. Today I will provide you the next step of yesterday’s pizza dough post and I am excited to announce that on 19 January at 13:30 UK time you can watch me via live stream on Facebook making this humble pie pizza.

The event on 19 January is the result of planning that did not go as expected during my live stream on 5 January 2025. By having this recipe you can follow along with me on the 19th.

As I said during my live stream on 5 January pizza is a journey. There is a lot of can do to vary it, to learn from it, and it is a great way to spend time with your children to create memories while teaching them a valuable skill.

The below video is from my live stream on 5 January and it will be one of the pizzas that I will make on 19 January. However, the other pizza its recipe will not be available until after the live stream.

Ingredients

To make this very delicious pizza you will need the following ingredients

1/2 lb (240g – 300g) of 20% fat mince beef. Alternatively you can use 240g – 300g of Italian Sausage.

1 large Green Pepper – chopped

1 medium to large (preferably) white but you can use a yellow onion. Sliced into rings

1 package of pepperoni

1 can Mutti Pizza Sauce Aromatic or Mutti Pizza Sauce Basil and Oregano

1 to 2 packages of 240g or 8 oz of Mozzarella Cheese

Pizza Dough earlier

some flour to use for rolling out the bread dough

Preheat over to 350 degrees or 180 – 200 degrees Celsius.

Tips regarding pizza ingredients

Regarding the mince, I have found 1/2 lb works well because it keeps the crust from getting soggy. However you can use up to a 1 lb of mince. If you wish to had a bit of spice to your mince, you can cook it with fennel seed or using taco seasoning. Alternatively, if you want a bit of spice to your pizza you can use Italian sausage.

If you are wondering why I have stated 20% fat mince this is because the high fat content retains the flavour more and works well if you season it. While there is nothing wrong with using mince with a lower fat content, I find I get the best results using 20%.

As for the pizza sauce, I recommend Mutti Pizza sauce because it is a very high quality sauce that rivals any sauce you can make at home. It gives a very authentic pizza sauce flavour and it is one of the few items I recommend you buy versus making it yourself.

Next, regarding the pizza dough. If you have prepared the dough in advance, take it out of the refrigerator and keep it covered. The dough should warm up to room temperature (about 45 minutes to 1 1/2 hours) and after reaching room temperature the dough should be pressed down and allowed to rise again, for at least 15 minutes. Typically, pressing down the dough should occur right before you brown the mince.

Finally regarding the Mozzarella cheese. This is where you can make this pizza your own. I find how much cheese to add is a personal choice. Plus you can experiment with adding other cheeses like mild cheddar and Parmesan cheese.

Making the Pizza

This is a fairly quick pizza to make.

First you will need to season the mince as you like it, break it a part, and brown it. The mince should be relatively fine. Once fully cooked, drain the fat and let the mince cool down.

Next, if you have not already chop the green pepper and cut into very thin rings, the onion. Please note, if the rings are cut too think they will not cook all of the way through.

Open the pepperoni and cheese.

Now take a bit of flour and lightly brush your counter with it, very lightly dust your bread dough with it, and dust your rolling pin with it. Take the dough and roll it out to about 1/4″ for a thinner crust and up to 1/2″ thick for a thicker crust. Once rolled out, take the crust and transfer to the pizza pan.

Take a fork and pierce the dough in several spots and then place the dough into the preheated oven for about 5 minutes and wearing hot mits then take out. The dough and pan will be hot.

Add the pizza sauce to the dough. It is likely you will have some sauce remaining and it can be refrigerated for later use. Take a handful of mozzarella cheese and sprinkle on top of the sauce. Now add about 1/2 of the pepperoni covering the bottom of the pizza then add onions and green pepper. After adding the ingredients, liberally cover the top of the pizza with cheese and add more pepperoni.

Cook the pizza for 10 – 20 minutes until the cheese is brown and bubbling. The crust should be light to moderate brown. Once it has achieved its desired consistency take out the pizza. Due to it cooking at a high temperature, it will be hot so please use hot mittens to take out and let it cool up to 5 minutes to allow you to cut through.

Enjoy this easy to make and delicious pizza.

Time to make

To assemble and bake the pizza is approximately 30 minutes and cost will depend if you have all of the ingredients. Total cost for the ingredients, minus the pizza dough, would be between £8 – £12 or around £1 per slice.

Deconstructing how to make the perfect pizza and pizza dough

Be Berry Informed is about for lack of a better word, lifestyle and more importantly, it is about how to make your life easier. As a part of that concept, simplifying your life, Be Berry Informed on 3 January 2025 lived streamed how to make the perfect pizza dough

and on 5 January 2025 Be Berry Informed created 2 videos, showing how to prepare the perfect pizza

and the results.

In order to re-purpose the remaining pizza dough, a dessert pizza was made

with the results.

In this article, I will deconstruct, review, what went well and what could have been better. I am doing this for two reasons. First, it is demonstrate self-reflection. To show my followers that it is important not to give up and how you can take an experience and develop from it. Second it is to set the scene for another event, where I come back and make improvements.

Bread Dough:

The Good:

Overall I was pleased with the dough. I felt I did get the temperature right and the simplicity of the recipe meant it was an easy one to teach.

The Bad:

When doing the video, I lost count of how many cups of flour I measured. I think this left the dough a bit sticky but it was very manageable. However, when it mixed it did not mix as well as it should have. This was a bit of a disappointment for me.

Pizza

The Good:

I was very pleased with the video and I felt it went very well. I felt I was able to explain the reason for choosing making pizza and how it can be an enriching experience for families.

The Bad:

Before live streaming, I struggled with what to do with the pizza dough. Do I take it out 90 minutes before streaming to have it reach room temperature and to flatten it so that it could rise or take it out of the fridge to show the viewers that bread dough can rise in the refrigerator. I opted for the latter because I felt, it by the time I assembled the pizza that the dough might have enough time at room temperature. Unfortunately, when I cut into the dough the dough did not have the texture I wanted and was disappointed. Also, after pre-cooking the dough for 5 minutes it was clear that my miscalculation on flour showed.

Another thing that could have been done better, was the planning for the second pizza. I knew I had cheese but when I took it out it was clear that it could not be used. The tomatoes were borderline usable and for a video, I chose not to use them. and because of the weather conditions, I could not run to the store for cheese and tomatoes. So, I had to re-plan the event.

Desert Pizza

The Good:

Be Berry Informed focus on lifestyle and as a part of the concept of lifestyle, Be Berry Informed is helping families save money so they can enjoy the success. Success does not mean being financially wealthy. Instead is about the wealth that comes from family time, being able to enjoy the money you make from working instead of paying bills, Be Berry Informed is about giving you ideas on how you can get the most from life. So by re-purposing the pizza dough it was to ensure you were able to get the most the money you spent and to reduce the total cost of the meal.

When I was younger I did make a lot of apple pies and apple crumble and from that experience, I had an idea of the basic recipe for the desert pizza. However, it has been a few years since I made an apple pie or crumble. This meant I was not 100% confident in my recipe. Nonetheless, when cooled enough to eat the filling was very good.

dissert pizza
copyright (2025) – Berry Photography (R) all rights reserved

The Bad:

I believe if I had 3 cups of sugar instead of 2 then the sauce would have the consistency I wanted. Because it was a bit runny, the sauce did drip into my oven creating a lot of smoke. Also, I think, I might have added too much butter and probably should have cut back just a bit on it. As for the crust, I feel it sort of worked but given some of the issue, I feel it took away from it. Plus pizza dough crust is probably not the best crust for a desert.

Finally

I will plan two events in two weeks and re-try this and see what further success comes from retrying.